Upgrading the Base OS in an M3 Anvil! Cluster: Difference between revisions
| (7 intermediate revisions by the same user not shown) | |||
| Line 149: | Line 149: | ||
== Rebuild Strikers == | == Rebuild Strikers == | ||
Much of the process of rebuilding machines in the Anvil! cluster is repeat of the steps used to build the machines in the first place. Please load this tutorial in a second tab. | |||
* [[Build_an_M3_Anvil!_Cluster#Installation_of_Base_OS|Installation of the Base OS]] | |||
=== Base OS Install === | |||
Start by rebuilding the Striker dashboards, one at a time. | Start by rebuilding the Striker dashboards, one at a time. | ||
Power off the first dashboard and reboot using | Power off the first dashboard and reboot using your preferred install media. Follow the install instructions from the [[Build_an_M3_Anvil!_Cluster#Installation_of_Base_OS|main install guide]]. Return to this guide after you configure the network, before you reach the 'Peering Striker Dashboards' stage, return here. | ||
=== Updating SSH Host Key === | |||
After the host has been rebuilt, it's [[SSH]] host key will have changed. | |||
The host key is recorded in the database, and that needs to be cleared before the new key can be recorded. There is no safe way to automate this process as it would undermine the "[[man in the middle]]" attacks that host key verification was designed to protect against. | |||
When any machine in the cluster finds that a host key has changed, the bad key will be recorded and you can see this in Striker. | |||
[[image:an-striker01-rhel9-m3-updating_ssh_01.png|thumb|center|400px|Go to Striker config.]] | |||
Click on the Striker logo and then on "Configure". | |||
[[image:an-striker01-rhel9-m3-updating_ssh_02.png|thumb|center|800px|Expand the "Manage changed SSH keys" toolbox.]] | |||
Click to expand the the "Manage changed SSH keys" toolbox, and the host(s) with the changed keys will appear. | |||
[[image:an-striker01-rhel9-m3-updating_ssh_04.png|thumb|center|800px|Confirm that you want to delete the key.]] | |||
Confirm that you want to delete the key. | |||
[[image:an-striker01-rhel9-m3-updating_ssh_05.png|thumb|center|800px|No remaining bad keys.]] | |||
After a minute, the old/bad key will be removed! | |||
=== Re-Peer The Striker === | |||
Once the dashboard has been configured, ''using the rebuilt node's web interface'', [[Build_an_M3_Anvil!_Cluster#Peering_Striker_Dashboards|peer the other striker]]. This will update the rebuilt dashboard's <span class="code">anvil.conf</span> to add the other dashboard. | Once the dashboard has been configured, ''using the rebuilt node's web interface'', [[Build_an_M3_Anvil!_Cluster#Peering_Striker_Dashboards|peer the other striker]]. This will update the rebuilt dashboard's <span class="code">anvil.conf</span> to add the other dashboard. | ||
| Line 198: | Line 230: | ||
If you see this, manually edit the referenced <span class="code">known_hosts</span> file and delete the referenced line number. | If you see this, manually edit the referenced <span class="code">known_hosts</span> file and delete the referenced line number. | ||
== Rebuild Subnodes == | |||
Each Anvil! node is built on two subnodes. Normally, all hosted servers run on one node or the other. So to upgrade, we'll take the node that is ''not'' currently hosting servers out and rebuild it first. After rebuild, when the storage has resynced, we'll migrate the servers and then rebuild the other subnode. | |||
So the first step is to determine which subnode is acting as the backup. | |||
Log into one of the subnodes, and run: | |||
{| class="wikitable" style="margin:auto" | |||
|- | |||
!On <span class="code">an-a03n01</span> | |||
|- | |||
|<syntaxhighlight lang="bash"> | |||
pcs resource status | |||
</syntaxhighlight> | |||
<syntaxhighlight lang="text"> | |||
* srv01-test (ocf::alteeve:server): Started an-a03n02 | |||
* srv02-test (ocf::alteeve:server): Started an-a03n02 | |||
</syntaxhighlight> | |||
|} | |||
This shows that the servers are on the subnode '<span class="code">an-a03n02</span>'. So we'll take subnode 1 out and rebuilt it first. | |||
This next step is to disable all Anvil! daemons using '<span class="code">[[anvil-manage-daemons]]</span>'. This isn't needed, but if you miss the magic key combination to select a boot device, this will keep the node from rejoining the peer, allowing you to just reboot the subnode again. | |||
{| class="wikitable" style="margin:auto" | |||
|- | |||
!On <span class="code">an-a03n01</span> | |||
|- | |||
|<syntaxhighlight lang="bash"> | |||
anvil-manage-daemons --disable | |||
</syntaxhighlight> | |||
<syntaxhighlight lang="text"> | |||
Disabling: [anvil-daemon] now... | |||
Disabling: [anvil-safe-start] now... | |||
Disabling: [scancore] now... | |||
Done. | |||
</syntaxhighlight> | |||
|} | |||
With the daemons disabled, lets now safely withdraw the node from the subcluster and power the machine off. | |||
{| class="wikitable" style="margin:auto" | |||
|- | |||
!On <span class="code">an-a03n01</span> | |||
|- | |||
|<syntaxhighlight lang="bash"> | |||
anvil-safe-stop --poweroff | |||
</syntaxhighlight> | |||
<syntaxhighlight lang="text"> | |||
Will now migrate any servers running on the cluster. | |||
No servers are running on this node now. | |||
Checking to see if we're "SyncSource" for any peer's replicated storage. | |||
Stopping all DRBD resources. | |||
Withdrawing this node from the cluster now. | |||
The cluster has stopped. | |||
Shutdown complete, powering off now. | |||
</syntaxhighlight> | |||
|} | |||
Now you can boot the machine off the install media for the new OS, and then follow the instructions to install [[Build_an_M3_Anvil!_Cluster#Installation_of_Base_OS the base OS]]. | |||
{{note|1=See below on deleting old DRBD resources!}} | |||
There's no guarantee during the later steps of the upgrade/rebuild that the new [[logical volumes]] that back the [[drbd]] resources will line up as they were before. For this reason, it's a good idea to wipe the old DRBD signatures during the reinstall. | |||
[[image:an-a03n01-alma9-m3-os-update-01.png|thumb|center|800px|Showing the old DRBD resource during the OS install.]] | |||
Above we see that the old DRBD resources are seen as unknown partitions. Click on the '<span class="code">-</span>' icon to delete the first one. | |||
[[image:an-a03n01-alma9-m3-os-update-02.png|thumb|center|800px|Check to delete all DRBD resources.]] | |||
Check to select the "Delete all the filesystems which are only used by Unknown.", and then click "Delete It". | |||
[[image:an-a03n01-alma9-m3-os-update-03.png|thumb|center|800px|The DRBD resources are gone, now remove the rest.]] | |||
Continue to delete the rest of the partitions until all are gone. | |||
[[image:an-a03n01-alma9-m3-os-update-04.png|thumb|center|800px|All old partitions are gone. Proceed as normal.]] | |||
With the old partitions gone, we can now configure the new partitions same as we did when first building the subnode. | |||
[[image:an-a03n01-alma9-m3-os-update-05.png|thumb|center|800px|New configuration is complete!]] | |||
From here, proceed with the setup as you did when you first built the subnode. | |||
=== Managing New SSH Keys === | |||
When you try to initialize the rebuilt subnode, you will see that it is already in the list, but it shows as offline. | |||
[[image:an-a03n01-alma9-m3-os-update-06.png|thumb|center|800px|About to initialize the subnode.]] | |||
When you reach the stage of initializing the rebuilt subnode, you will find that it fails. | |||
[[image:an-a03n01-alma9-m3-os-update-07.png|thumb|center|800px|About to initialize the subnode.]] | |||
This is because the rebuilt host's [[SSH]] key has changed. For security reasons, we can't simply clear the old key, as that would make the cluster vulnerable to "[https://en.wikipedia.org/wiki/Man-in-the-middle_attack man in the middle]" attacks. | |||
Once the connection attempt has failed, the bad key will be registered with the system, and you can choose to remove it yourself. To do this, click on the Striker logo and choose "Configure" and then "Manage changed SSH keys". | |||
[[image:an-a03n01-alma9-m3-os-update-08.png|thumb|center|800px|Bad keys in "Manage changed SSH keys".]] | |||
Select the keys pointing to <span class="code">10.201.14.1</span> (the IP we used to try to connect to the subnode), and then click on the trash can icon. | |||
[[image:an-a03n01-alma9-m3-os-update-09.png|thumb|center|800px|Deleting the bad keys.]] | |||
Press "Delete" to confirm. | |||
[[image:an-a03n01-alma9-m3-os-update-10.png|thumb|center|800px|Confirm the deleting of the old keys.]] | |||
After a few moments, the bad keys will disappear. | |||
[[image:an-a03n01-alma9-m3-os-update-11.png|thumb|center|800px|The bad keys are gone.]] | |||
You can now initialize the rebuilt subnode as you did during the initial setup. | |||
<span class="code"></span> | |||
<syntaxhighlight lang="bash"> | |||
</syntaxhighlight> | |||
<syntaxhighlight lang="text"> | |||
</syntaxhighlight> | |||
== Rebuild DR == | == Rebuild DR == | ||
| Line 205: | Line 361: | ||
{{note|1=Even though this is a DR host, <span class="code">anvil-safe-stop</span> checks to ensure [[pacemaker]] isn't running. Being a DR host, it won't be. So the messages related to exiting the cluster can be ignored.}} | {{note|1=Even though this is a DR host, <span class="code">anvil-safe-stop</span> checks to ensure [[pacemaker]] isn't running. Being a DR host, it won't be. So the messages related to exiting the cluster can be ignored.}} | ||
<syntaxhighlight lang="bash"> | {| class="wikitable" style="margin:auto" | ||
anvil-safe-stop | |- | ||
!On <span class="code">an-a03dr01</span> | |||
|- | |||
|<syntaxhighlight lang="bash"> | |||
anvil-safe-stop --poweroff | |||
</syntaxhighlight> | </syntaxhighlight> | ||
<syntaxhighlight lang="text"> | <syntaxhighlight lang="text"> | ||
| Line 215: | Line 375: | ||
Stopping all DRBD resources. | Stopping all DRBD resources. | ||
The cluster has stopped. | The cluster has stopped. | ||
Shutdown complete, powering off now. | |||
</syntaxhighlight> | </syntaxhighlight> | ||
|} | |||
For this point, rebuild the DR Host following the steps in [[Build_an_M3_Anvil!_Cluster#Installation_of_Base_OS the main tutorial]]. | For this point, rebuild the DR Host following the steps in [[Build_an_M3_Anvil!_Cluster#Installation_of_Base_OS the main tutorial]]. | ||
Latest revision as of 15:52, 30 August 2024
|
Alteeve Wiki :: How To :: Upgrading the Base OS in an M3 Anvil! Cluster |
Overview
This article covers rebuilding an Anvil! to upgrade or change the base operating system of all the machines in the cluster.
In short, the process will be to remove each machine from the cluster, reinstall the new OS, and integrate it back into the cluster. We'll do Strikers, Subnodes and a DR host.
This tutorial will also serve as a guide to rebuilding a machine that failed and was replaced. The only difference will be that the installed OS will stay the same.
For this tutorial, we will be updating from CentOS Stream 8 to AlmaLinux 9. The process should work between RHEL, as either the source and/or the destination OS.
Updating
It is critical to update the cluster to ensure all machines are running the latest versions of the various cluster components. This will maximise the chance that there are no compatibility issues as each machines is rebuilt.
If A Machine Has Failed
If you are replacing a failed machine, follow the "Replacing a Failed Machine in an M3 Anvil! Cluster" tutorial. You can rebuild the lost machine with the new OS version, so long as the new OS is one major version newer.
That is to say, if you have an EL 8 based M3 cluster, you can use EL 9 as the OS of the machine being replaced. However, if you do this, please proceed with this tutorial to upgrade the rest of the machines in the cluster as soon as possible after completing the replacement of the lost machine.
Whether replacing a machine that failed, or upgrading, it is critically important to update the cluster first. This will ensure that the versions of applications installed on the rebuilt machine matches / is compatible with the versions to be installed on the rebuilt systems.
If All Machines Are Online
If you're doing a planned update, and all machines in the Anvil! cluster is online, you can use striker-update-cluster.
This is the scenario we will be covering in this tutorial.
Pre-Upgrade Update
| Note: This next step will include migrating servers between subnodes. This causes some amount of performance impact on the guests. As such, consider this potential impact when scheduling this update. |
We can run the cluster update from either striker dashboard. For this tutorial, we will use an-striker01.
striker-update-cluster
16:53:36; - Verifying access to: [an-a03dr01]...
16:53:37; Connected on: [10.201.14.3] via: [bcn1]
16:53:37; - Verifying access to: [an-a03n01]...
16:53:37; Connected on: [10.201.14.1] via: [bcn1]
16:53:37; - Verifying access to: [an-a03n02]...
16:53:37; Connected on: [10.201.14.2] via: [bcn1]
16:53:37; - Verifying access to: [an-striker01]...
16:53:37; Connected on: [10.201.4.1] via: [bcn1]
16:53:37; - Verifying access to: [an-striker02]...
16:53:38; Connected on: [10.201.4.2] via: [bcn1]
16:53:38; - Success!
16:53:38; [  Note   ] - All nodes need to be up and running for the update to run on nodes.
16:53:38; [  Note   ] - Any out-of-sync storage needs to complete before a node can be updated.
16:53:38; [ Warning ] - Servers will be migrated between subnodes, which can cause reduced performance during
16:53:38; [ Warning ] - these migrations. If a sub-node is not active, it will be activated as part of the
16:53:38; [ Warning ] - upgrade process.
Here, we see that the update program verified access to all known machines. With this confirmed, you will be asked to proceed.
Proceed? [y/N]
If you're ready, enter 'y'.
y
Thank you, proceeding.
16:55:06; Disabling Anvil! daemons on all hosts...
16:55:06; - Disabling daemons on: [an-a03dr01]...
16:55:06; anvil-daemon stopped.
16:55:07; scancore stopped.
16:55:07; - Done!
16:55:07; - Disabling daemons on: [an-a03n01]...
16:55:07; anvil-daemon stopped.
16:55:07; scancore stopped.
16:55:07; - Done!
16:55:07; - Disabling daemons on: [an-a03n02]...
16:55:08; anvil-daemon stopped.
16:55:08; scancore stopped.
16:55:08; - Done!
16:55:08; - Disabling daemons on: [an-striker01]...
16:55:09; anvil-daemon stopped.
16:55:09; scancore stopped.
16:55:09; - Done!
16:55:09; - Disabling daemons on: [an-striker02]...
16:55:09; anvil-daemon stopped.
16:55:09; scancore stopped.
16:55:09; - Done!
16:55:09; Enabling 'anvil-safe-start' on nodes to prevent hangs on reboot.
16:55:10; - Done!
16:55:10; Starting the update of the Striker dashboard: [an-striker01].
16:55:10; - Beginning OS update of: [an-striker01].
16:55:10; - Calling update now.
16:55:10; - NOTE: This can seem like it's hung! You can watch the progress using 'journalctl -f' on another terminal to
16:55:10; -       watch the progress via the system logs. You can also check with 'ps aux | grep dnf'.
<...snip...>
From here, the update will continue to run. How long this takes depends on several factors;
- How many updates are needed and how long do they take to install?
- How much data needs to be downloaded and how fast the Internet connection is.
- How long it takes to migrate servers between subnodes in each node pair?
- How many nodes you have, and how many DR hosts you have?
After the update completes
<...snip...>
16:57:35; - Both subnodes are online, will now check replicated storage.
16:57:35; - This is the second node, no need to wait for replication to complete.
16:57:35; - Running 'anvil-version-changes'.
16:57:37; - Done!
16:57:37; Enabling Anvil! daemons on all hosts...
16:57:37; - Enabling dameons on: [an-a03dr01]...
16:57:37; anvil-daemon started.
16:57:38; scancore started.
16:57:38; - Done!
16:57:38; - Enabling dameons on: [an-a03n01]...
16:57:38; anvil-daemon started.
16:57:39; scancore started.
16:57:39; - Done!
16:57:39; - Enabling dameons on: [an-a03n02]...
16:57:39; anvil-daemon started.
16:57:39; scancore started.
16:57:39; - Done!
16:57:39; - Enabling dameons on: [an-striker01]...
16:57:39; anvil-daemon started.
16:57:40; scancore started.
16:57:40; - Done!
16:57:40; - Enabling dameons on: [an-striker02]...
16:57:40; anvil-daemon started.
16:57:40; scancore started.
16:57:40; - Done!
16:57:40; Updates complete!
We're ready to proceed with rebuilding each machine!
Rebuilding Machines
Each physical machine in the cluster will have to have their operating system reinstalled with the new version of the operating system. In this tutorial, that means we'll install AlmaLinux 9.
| Note: Doing an in-place update of the operating system is not recommended. Upgrading from RHEL 8 to 9 is supported by Red Hat, but it is not tested by Alteeve. |
Rebuild Strikers
Much of the process of rebuilding machines in the Anvil! cluster is repeat of the steps used to build the machines in the first place. Please load this tutorial in a second tab.
Base OS Install
Start by rebuilding the Striker dashboards, one at a time.
Power off the first dashboard and reboot using your preferred install media. Follow the install instructions from the main install guide. Return to this guide after you configure the network, before you reach the 'Peering Striker Dashboards' stage, return here.
Updating SSH Host Key
After the host has been rebuilt, it's SSH host key will have changed.
The host key is recorded in the database, and that needs to be cleared before the new key can be recorded. There is no safe way to automate this process as it would undermine the "man in the middle" attacks that host key verification was designed to protect against.
When any machine in the cluster finds that a host key has changed, the bad key will be recorded and you can see this in Striker.
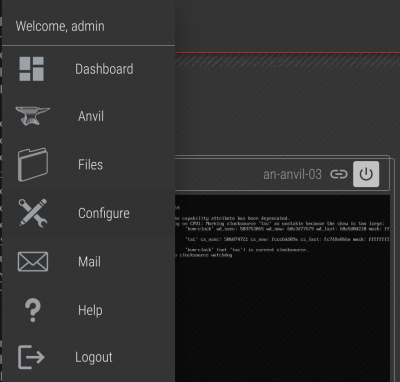
Click on the Striker logo and then on "Configure".
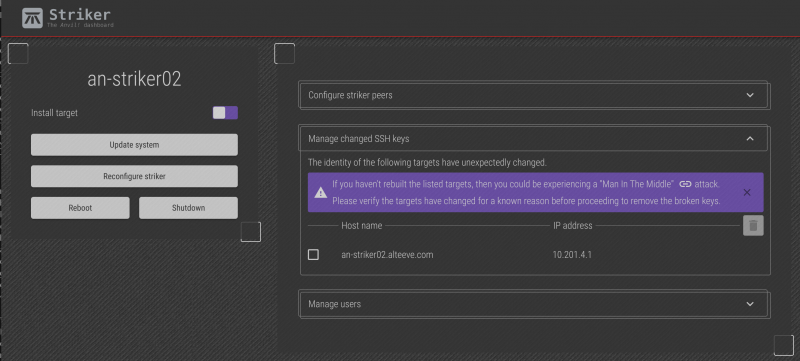
Click to expand the the "Manage changed SSH keys" toolbox, and the host(s) with the changed keys will appear.
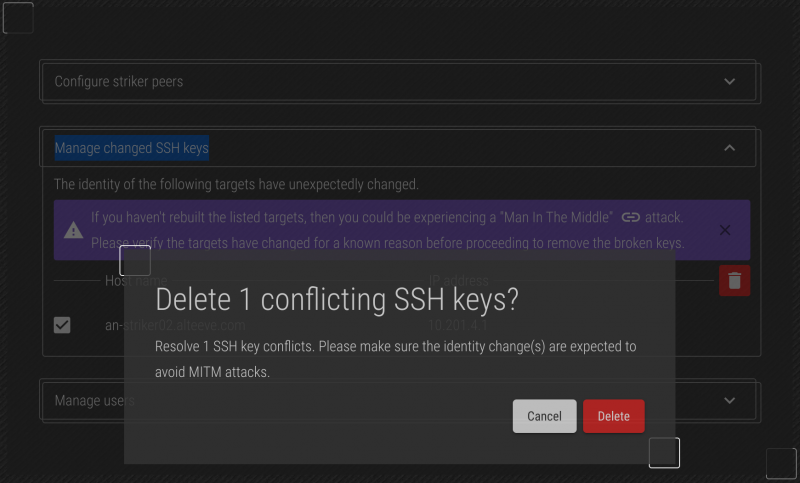
Confirm that you want to delete the key.

After a minute, the old/bad key will be removed!
Re-Peer The Striker
Once the dashboard has been configured, using the rebuilt node's web interface, peer the other striker. This will update the rebuilt dashboard's anvil.conf to add the other dashboard.
Once re-peered, please do the following to ensure the database has been resynced on the rebuilt Striker;
On both Striker dashboards, run (as root or via sudo):
systemctl stop anvil-daemon.service scancore.service
Then on the rebuilt striker, please run:
anvil-daemon --run-once --resync-db
WARNING:  skipping "pg_toast_1260" --- only superuser can vacuum it
WARNING:  skipping "pg_toast_1260_index" --- only superuser can vacuum it
<...snip...>
WARNING:  skipping "pg_replication_origin" --- only superuser can vacuum it
WARNING:  skipping "pg_shseclabel" --- only superuser can vacuum it
This could take some time to complete, so please be patient.
Once the above command completes, restart the daemons.
systemctl start anvil-daemon.service scancore.service
Done! The first striker has been upgrade. Repeat the process for the second striker!
Host Key Issue
| Note: The Anvil! software tries to confirm that a machine in the cluster has been rebuilt and update all other's to trust the new key. This doesn't always work, and when it doesn't, it is considered a bug that we will try to fix. So please open an issue, or if you have a support contract, open a ticket. |
In some cases, other hosts will not update to the new key. If you see a message like the following in anvil.log;
2024/08/19 14:31:47:Remote.pm:683; The target's host key has changed. If the target has been rebuilt, or the target IP reused, the old key will need to be removed. If this is the case, remove line: [5] from: [/root/.ssh/known_hosts].
If you see this, manually edit the referenced known_hosts file and delete the referenced line number.
Rebuild Subnodes
Each Anvil! node is built on two subnodes. Normally, all hosted servers run on one node or the other. So to upgrade, we'll take the node that is not currently hosting servers out and rebuild it first. After rebuild, when the storage has resynced, we'll migrate the servers and then rebuild the other subnode.
So the first step is to determine which subnode is acting as the backup.
Log into one of the subnodes, and run:
| On an-a03n01 |
|---|
pcs resource status
  * srv01-test	(ocf::alteeve:server):	 Started an-a03n02
  * srv02-test	(ocf::alteeve:server):	 Started an-a03n02
|
This shows that the servers are on the subnode 'an-a03n02'. So we'll take subnode 1 out and rebuilt it first.
This next step is to disable all Anvil! daemons using 'anvil-manage-daemons'. This isn't needed, but if you miss the magic key combination to select a boot device, this will keep the node from rejoining the peer, allowing you to just reboot the subnode again.
| On an-a03n01 |
|---|
anvil-manage-daemons --disable
Disabling: [anvil-daemon] now...
Disabling: [anvil-safe-start] now...
Disabling: [scancore] now...
Done.
|
With the daemons disabled, lets now safely withdraw the node from the subcluster and power the machine off.
| On an-a03n01 |
|---|
anvil-safe-stop --poweroff
Will now migrate any servers running on the cluster.
No servers are running on this node now.
Checking to see if we're "SyncSource" for any peer's replicated storage.
Stopping all DRBD resources.
Withdrawing this node from the cluster now.
The cluster has stopped.
Shutdown complete, powering off now.
|
Now you can boot the machine off the install media for the new OS, and then follow the instructions to install Build_an_M3_Anvil!_Cluster#Installation_of_Base_OS the base OS.
| Note: See below on deleting old DRBD resources! |
There's no guarantee during the later steps of the upgrade/rebuild that the new logical volumes that back the drbd resources will line up as they were before. For this reason, it's a good idea to wipe the old DRBD signatures during the reinstall.
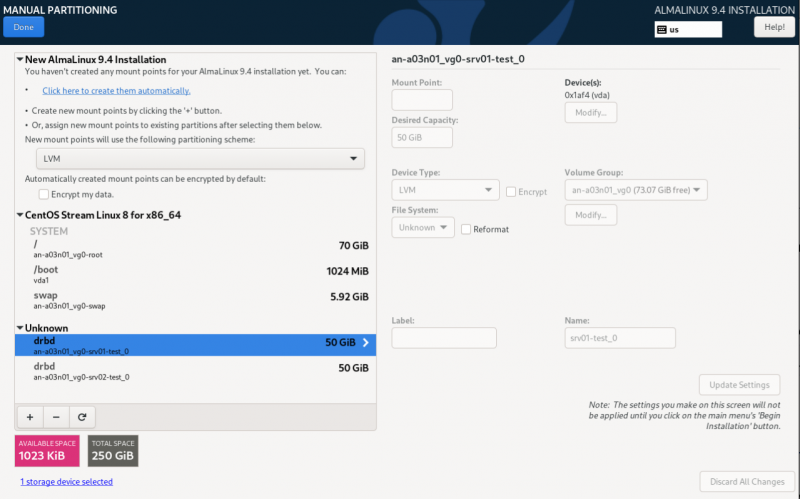
Above we see that the old DRBD resources are seen as unknown partitions. Click on the '-' icon to delete the first one.
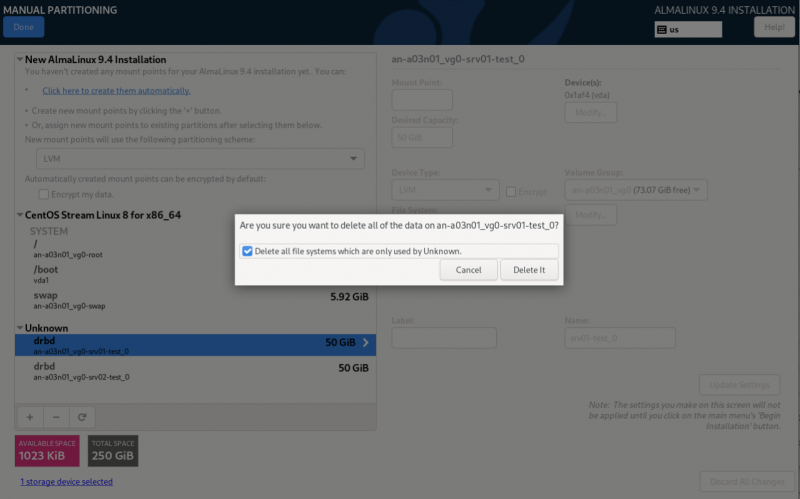
Check to select the "Delete all the filesystems which are only used by Unknown.", and then click "Delete It".

Continue to delete the rest of the partitions until all are gone.
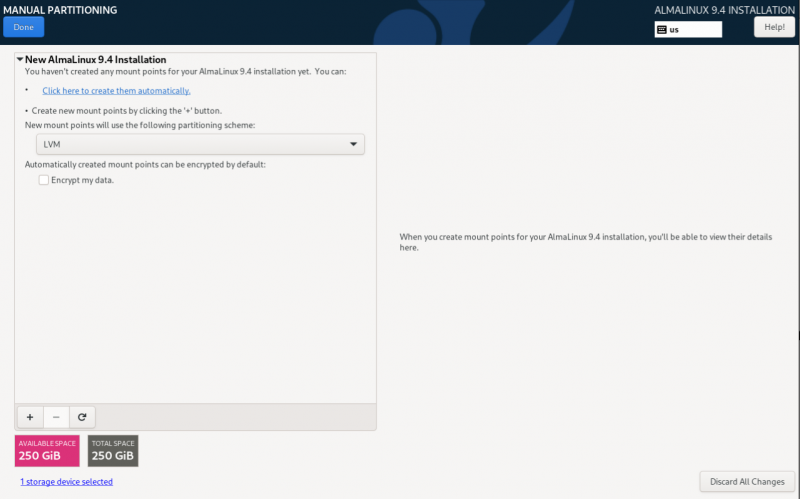
With the old partitions gone, we can now configure the new partitions same as we did when first building the subnode.
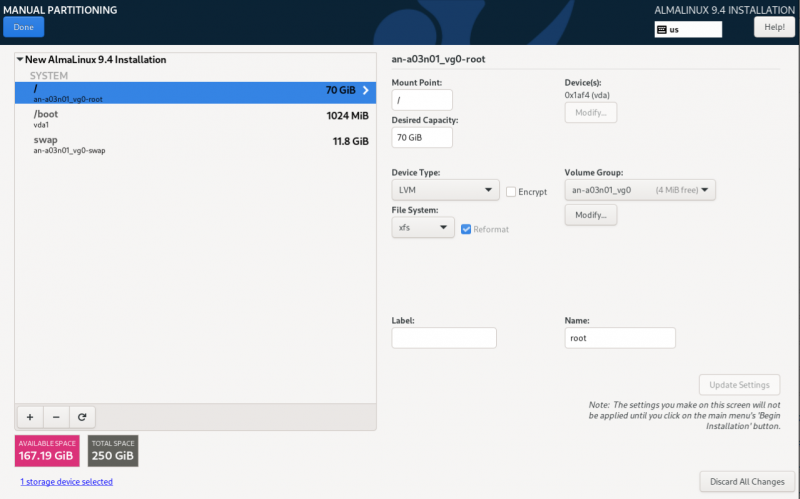
From here, proceed with the setup as you did when you first built the subnode.
Managing New SSH Keys
When you try to initialize the rebuilt subnode, you will see that it is already in the list, but it shows as offline.
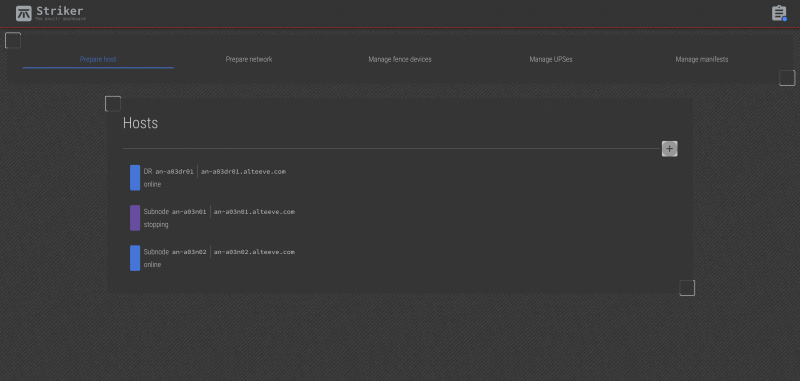
When you reach the stage of initializing the rebuilt subnode, you will find that it fails.
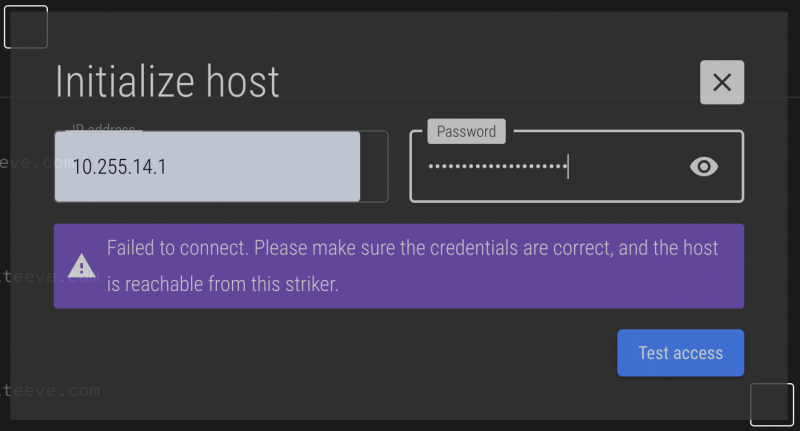
This is because the rebuilt host's SSH key has changed. For security reasons, we can't simply clear the old key, as that would make the cluster vulnerable to "man in the middle" attacks.
Once the connection attempt has failed, the bad key will be registered with the system, and you can choose to remove it yourself. To do this, click on the Striker logo and choose "Configure" and then "Manage changed SSH keys".
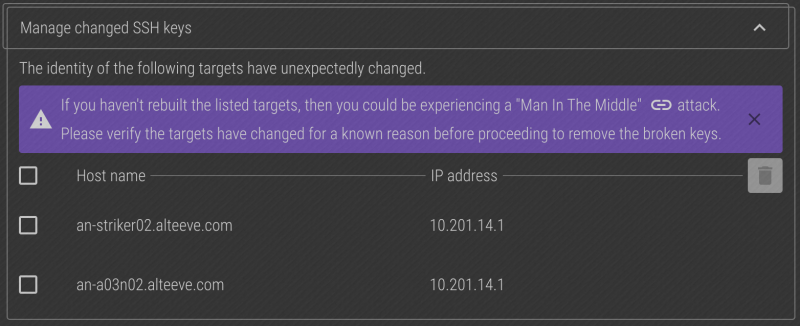
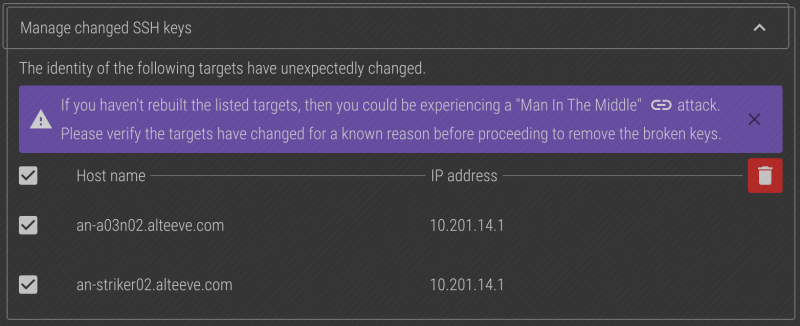
Select the keys pointing to 10.201.14.1 (the IP we used to try to connect to the subnode), and then click on the trash can icon.
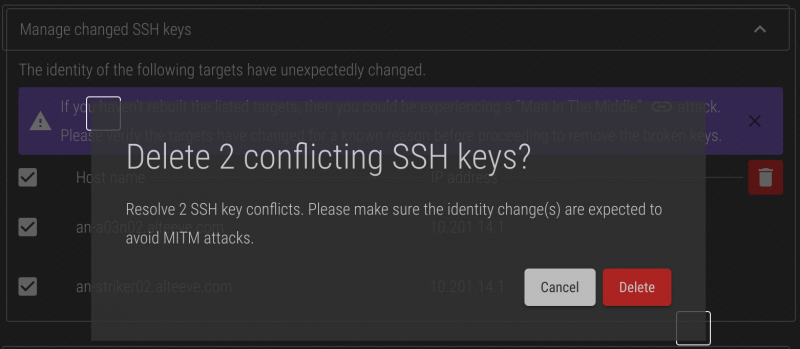
Press "Delete" to confirm.
After a few moments, the bad keys will disappear.

You can now initialize the rebuilt subnode as you did during the initial setup.
Rebuild DR
DR hosts work by being a target for replicated storage. The anvil-safe-stop tool is used to shut down these replications safely (holding if they're SyncSource. So our first step is to stop the DR host.
| Note: Even though this is a DR host, anvil-safe-stop checks to ensure pacemaker isn't running. Being a DR host, it won't be. So the messages related to exiting the cluster can be ignored. |
| On an-a03dr01 |
|---|
anvil-safe-stop --poweroff
Will now migrate any servers running on the cluster.
The cluster has stopped.
No servers are running on this node now.
Checking to see if we're "SyncSource" for any peer's replicated storage.
Stopping all DRBD resources.
The cluster has stopped.
Shutdown complete, powering off now.
|
For this point, rebuild the DR Host following the steps in Build_an_M3_Anvil!_Cluster#Installation_of_Base_OS the main tutorial.
| Any questions, feedback, advice, complaints or meanderings are welcome. | |||
| Alteeve's Niche! | Enterprise Support: Alteeve Support |
Community Support | |
| © Alteeve's Niche! Inc. 1997-2024 | Anvil! "Intelligent Availability®" Platform | ||
| legal stuff: All info is provided "As-Is". Do not use anything here unless you are willing and able to take responsibility for your own actions. | |||
